CUDA & Emergent SDK setup
This page covers setting up Linux, the Emergent SDK, the NVIDIA driver, and CUDA. These are the foundational steps before any of the other dependencies.
Overview of steps:
- Initial setup before installing Linux
- Install Linux
- Post installation — change grub configuration
- Update and install some useful software
- Install Emergent SDK and dependencies
- Install NVIDIA driver
- Install CUDA (depends on NVIDIA driver)
Initial set-up before installing Linux
- Create a bootable Linux USB for an Ubuntu 22.04.4 ISO:
ubuntu-22.04.4-desktop-amd64.iso. The default kernel is 6.5.- Alternatively, use balenaEtcher to make a bootable Linux USB.
- Ensure the following on the PC:
- An existing video card that displays the existing OS or BIOS screen on a monitor — no need to worry about graphics driver for now.
- At least 3 USB ports that work when you enter BIOS/installation (mouse / keyboard / Linux USB).
- Important: disable any wired/wireless network connections during the install, otherwise it will automatically upgrade to kernel 6.8. As of writing, Emergent eSDK only supports up to kernel 6.5.
- Plug the bootable Linux USB into one of the active ports and boot up the PC.
- If the PC does not directly boot into the Linux USB, change
Boot settingsin BIOS:- Enter BIOS by pressing F2 or DEL (could be a different key on some motherboards).
- Go into the BOOT menu and set it to boot from the Linux USB (disable all other boot options).
- Save and reboot.
Possible issues you may encounter
- Keyboard/mice not working — not all USB ports may work during installation. Try plugging into different ports.
- Screen does not boot into the Linux USB — reformat the USB and recreate, or try a different USB stick.
Install Linux
- Wait until the Ubuntu desktop is visible and go step-by-step:
Install Ubuntu.- Choose keyboard layout, time zones, etc.
- Under
Updates and other software, choose onlyMinimal Installation. - Under
Installation type, chooseErase Disk and Install Ubuntu. - Choose default disk/partition to install Ubuntu.
- Set up user accounts. Do not run the software upgrade prompted near the end of install.
- Once installation completes and you log in, open a terminal (
Ctrl + Alt + T) and check the Ubuntu and kernel versions: Expected output:
Post installation — change grub configuration
This step is needed to boot into secure mode for installing NVIDIA drivers and to detect multiple GPUs.
- Open and edit the grub menu file (
/etc/default/grub): - Set the following options (lines beginning with
#are comments — keep or remove as needed): - Save the file and update grub:
-
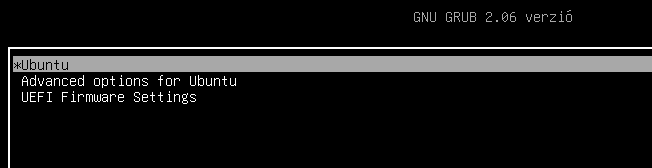
Reboot and verify you can enter the splash screen.
Expected output
Update and install some useful software
- Disable automatic updates and upgrades, and only then connect to ethernet.
- Run an update:
- Install required packages:
- Set up SSH client and server:
- (Optional) Install
grub-customizerto show only the required kernel if you end up with multiple kernels. - Make the following directories for convenience:
/home/$USER/setup_files— for downloaded drivers and installation files./home/$USER/nvidia— for building dependencies./home/$USER/src— for cloned source repos.
Install Emergent SDK and dependencies
0. Ensure the Emergent quad-port NIC is plugged into the PCIe slot.
1. Download files from the Emergent FTP server:
- eSDK: download
eSDK_2_55_02_eCap_2_11_04_Ubuntu_22_04_6_5_0_x64.zip - Rivermax license file (
rivermax.lic)
2. Unzip and install the eSDK (assumes downloads are in /home/$USER/setup_files):
cd /home/$USER/setup_files
unzip eSDK_2_55_02_eCap_2_11_04_Ubuntu_22_04_6_5_0_x64.zip -d emergent
cd emergent
sudo ./install_eSdk.sh -i Mellanox
The script downloads and installs the Mellanox NIC driver and dependencies. On success:
3. Acquire a license file from Emergent Vision and copy it to /opt/mellanox:
4. Launch eCapture (you can't acquire frames yet — NIC isn't configured):
5. Configure network settings for the NIC. Under Settings > Network, you should see four similarly-named EVT NIC interfaces (enp97s0 and enp97s0dX).
Screenshot
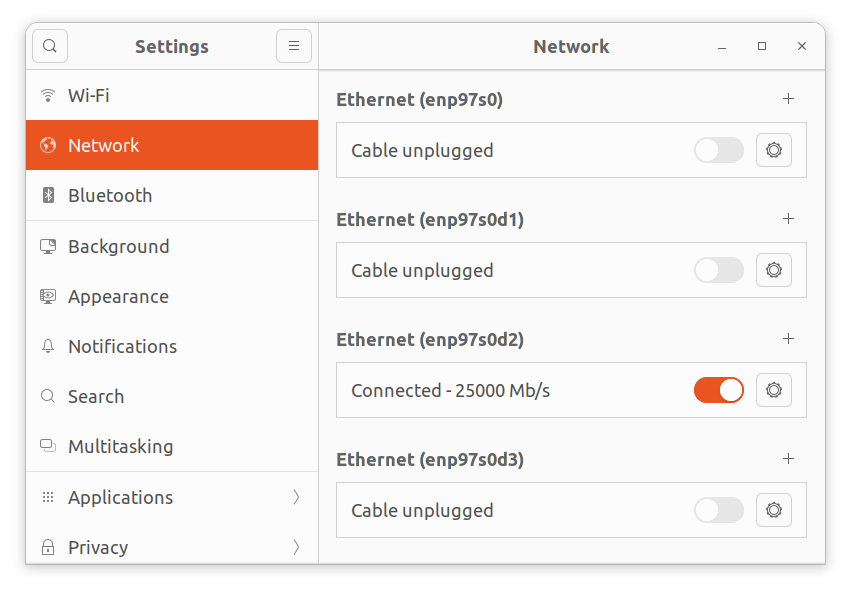
In the screenshot above, enp97s0d2 shows as connected because a camera is plugged into that port. Apply the following network settings to each EVT NIC interface you want to use:
| property | value |
|---|---|
| MTU | 9000 |
| IPv4 | Manual |
| Address | 192.168.13.10 |
| Netmask | 255.255.255.0 |
| Gateway | 192.168.13.1 |
Convention: keep each interface on a different subnet — e.g. 192.168.10.10, 192.168.11.10, 192.168.12.10 for the other three interfaces.
6. Configure cameras to stream through eCapture:
- Connect camera to the EVT NIC port using a fiber optic cable, then power on.
- Open the eCapture app:
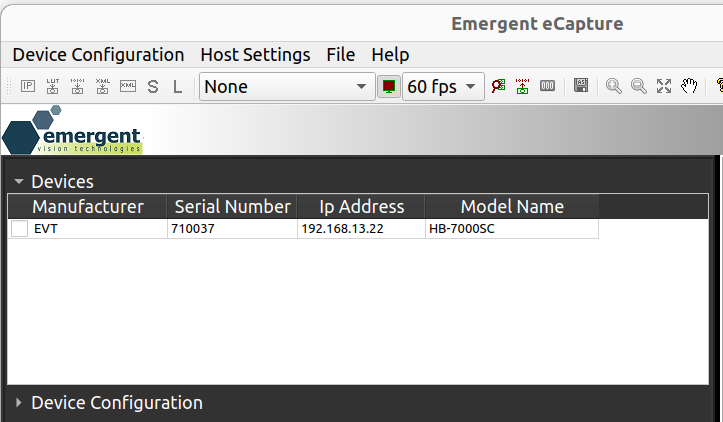
-
If the camera IP is configured properly, it should show up under the
Devicespanel.Expected output
-
If the camera does not show up, force an IP from
Device Configuration → Force ip:field value MAC/SN the serial number on the camera IP address if the camera is plugged to the NIC port with IP 192.168.13.10, the camera IP should be192.168.13.XX(XX ≠ 10)Subnet 255.255.255.0 Gateway 0.0.0.0 -
Click
Applyand wait a few seconds — the camera should appear underDevices. - Note: the above sets a temporary IP. To persist after power cycling, use
Device Configuration → IP Configuration, setPersistent IP Address, thenWrite Configuration. - Test by power-cycling the camera and verify you can acquire frames.
7. Update camera firmware to 3.70. Download the firmware from Emergent FTP and move to /home/$USER/setup_files. Typical files:
- BIN file:
HB_IMX4xx_3.70.bin(may differ for your camera — but always a.bin) - XML file:
XML_HB-7000S-C_3_70.zip
Follow the instructions in the included Readme.txt.
Install NVIDIA driver
0. Download the driver setup file. Go to NVIDIA's Linux driver archive and pick a version:
535.183.06for Linux kernel 6.5525.105.17works well with the A6000 (or a PC with both A16 and A6000)550.90.07works well with multiple A16
1. Run the installation file. Strongly recommended: boot into secure mode first (X driver running causes issues).
cd /home/$USER/setup_files
chmod +x NVIDIA-Linux-x86_64-535.183.06.run
sudo ./NVIDIA-Linux-x86_64-535.183.06.run
In the prompts that appear:
- →
Continue Installation - →
Okfor removing Nouveau - →
Yesfor creating modprobe file - →
Nofor 32-bit compatibility
If installation fails, check the log:
2. Common errors and fixes:
gccversion mismatch. Install the expectedgccversion and re-run with theCCenvironment variable:- Missing dependencies/packages (e.g.
pkg-config,libglvnd). Install them and re-run; you may need to do this multiple times since the installer only checks one at a time.
If you hit other errors and find a fix, please open a PR to add it here.
3. Verify driver installation:
This should list the GPUs accessible via the driver.
Install CUDA (depends on NVIDIA driver installation)
0. Download the installation file. We use CUDA 12.2 with driver 535.104.05. Other versions are at the CUDA toolkit archive — prefer the runfile (local) installer.
1. Run the install file:
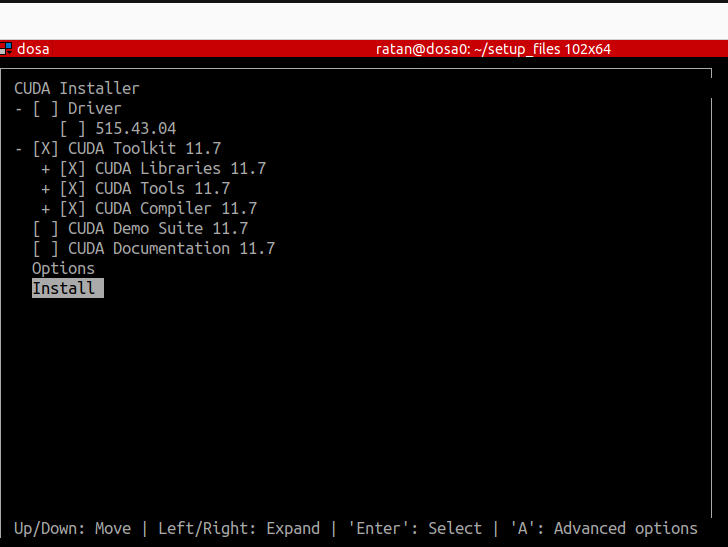
Important:
- Uncheck
Driverunder theCUDA Installermenu — don't reinstall the driver. - Check
CUDA Toolkit 12.X. - Start installation with
Installand follow prompts.
Install menu
Note the path CUDA installs to (usually /usr/local/cuda).
2. Add to PATH and verify:
Edit .bashrc:
Add CUDA's path:
Save, then verify:
Enable GPU-Direct
0. Enable PCIE Above 4G Decoding and Resizable Bar. In BIOS, enable PCIE Above 4G Decoding and Resizable Bar. You may need to upgrade the BIOS if these aren't supported.
1. Load the nvidia-peer-memory module. Activate the init script start-nvidia-peermem so the system loads the module on boot:
Verify:
Expected: